Real-time detection
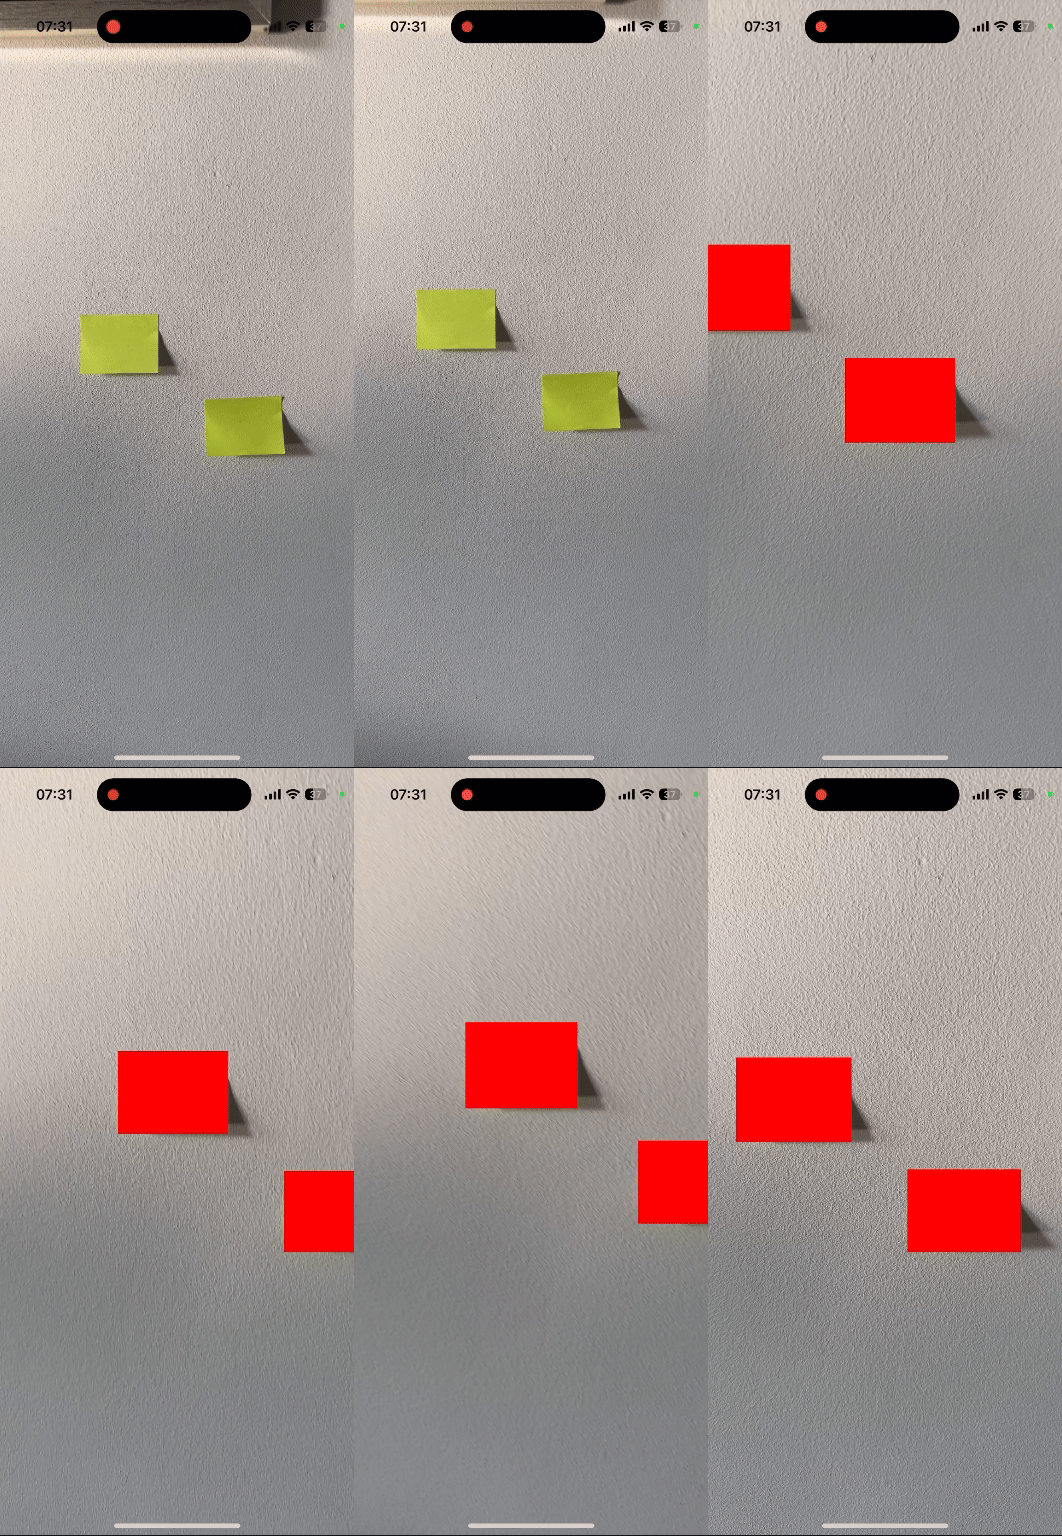
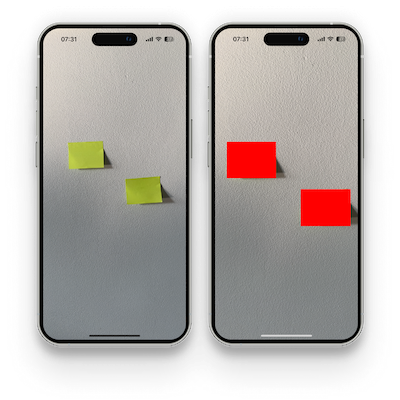
In this example, I show how to use the Fast OpenCV library together with the Vision Camera library’s frame processor. Our goal will be to detect a coloured object and mark it on the screen.
Requirements
- We must have the react-native-fast-opencv library installed.
- VisionCamera together with WorkletsCore to handle the frame processors must be installed. Detailed instructions are available here .
- Installed react-native-vision-camera-resizer to perform efficient frame scaling.
- Installed react-native-vision-camera-skia for drawing elements on frames.
Code
We will start by constructing the base. Our component will have a SkiaCamera component used and a frame handler that scales the incoming frame.
import { PaintStyle, Skia } from '@shopify/react-native-skia';
import { useEffect } from 'react';
import { StyleSheet, Text } from 'react-native';
import {
  OpenCV,
  DataTypes,
  Mat,
  ColorConversionCodes,
  RetrievalModes,
  ContourApproximationModes,
  Scalar,
  MatVector,
  Rect,
} from 'react-native-fast-opencv';
import {
  useCameraDevice,
  useCameraPermission,
} from 'react-native-vision-camera';
import { SkiaCamera } from 'react-native-vision-camera-skia';
import { useResizer, type GPUFrame } from 'react-native-vision-camera-resizer';

const paint = Skia.Paint();
paint.setStyle(PaintStyle.Fill);
paint.setColor(Skia.Color('red'));

const RESIZER_WIDTH = 320;
const RESIZER_HEIGHT = 180;

export function CameraRealtimeDetection() {
  const device = useCameraDevice('back');
  const { hasPermission, requestPermission } = useCameraPermission();

  const { resizer } = useResizer({
    width: RESIZER_WIDTH,
    height: RESIZER_HEIGHT,
    channelOrder: 'bgr',
    dataType: 'uint8',
    pixelLayout: 'interleaved',
    scaleMode: 'contain',
  });

  useEffect(() => {
    requestPermission();
  }, [requestPermission]);

  if (!hasPermission) {
    return <Text>No permission</Text>;
  }

  if (device == null) {
    return <Text>No device</Text>;
  }

  return (
    <SkiaCamera
      style={styles.container}
      device={device}
      isActive={true}
      orientationSource="interface"
      onFrame={(frame, render) => {
        'worklet';
        const height = frame.height / 4;
        const width = frame.width / 4;

        const resized = resizer!.resize(frame) as GPUFrame;
        const pixels = new Uint8Array(resized.getPixelBuffer());

        resized.dispose();
        frame.dispose();
      }}
    />
  );
}

const styles = StyleSheet.create({
  container: {
    flex: 1,
  },
});
We scale the frame with the resizer to reduce its size and enable faster processing, and read the scaled pixels into a Uint8Array. In addition, we handle permissions for the Camera.
Now let’s focus on the frame handler. Our aim will be to detect a bright green object (card) and mark it on the screen in real time.
To do this, let us create a Mat object from the resized pixel buffer.
const src = Mat.createFromBuffer('uint8', height, width, 3, pixels);And another object that will contain our processed image.
const dst = Mat.create(0, 0, DataTypes.CV_8U);In order to find the object easily, it will be necessary to change the colour to HSV. We can also create Scalar objects that will be the beginning of our detected range and its end. The cvtColor function changes the colour format, while the inRange function leaves only those pixels whose colour fits within the specified range.
const lowerBound = Scalar.create(30, 60, 60);
const upperBound = Scalar.create(50, 255, 255);
OpenCV.cvtColor(src, dst, ColorConversionCodes.COLOR_BGR2HSV);
OpenCV.inRange(dst, lowerBound, upperBound, dst);
We further split the image into channels and extract the first channel.
const channels = MatVector.create();
OpenCV.split(dst, channels);
const grayChannel = channels.get(0);
Now we will deal with finding the contours in order to do this we will use the findContours function.
const contours = MatVector.create();
OpenCV.findContours(
  grayChannel,
  contours,
  RetrievalModes.RETR_TREE,
  ContourApproximationModes.CHAIN_APPROX_SIMPLE
);
Our detected card must be quite large to be detected. We therefore filter out those objects that are too small. To do this, we use the contourArea function to take the size of the contour and then, if it is larger than a fixed value, find a rectangle that will be able to cover it (boundingRect function).
const contoursCount = contours.length;
const rectangles: Rect[] = [];

for (let i = 0; i < contoursCount; i++) {
  const contour = contours.get(i);
  const { value: area } = OpenCV.contourArea(contour, false);

  if (area > 3000) {
    const rect = OpenCV.boundingRect(contour);
    rectangles.push(rect);
  }
}
We can mark the elements detected in this way using Skia inside the render callback, drawing the camera frame first and then the detected rectangles on top of it.
const scaleToCanvasX = frame.width / RESIZER_HEIGHT;
const scaleToCanvasY = frame.height / RESIZER_WIDTH;

render(({ canvas, frameTexture }) => {
  canvas.drawImage(frameTexture, 0, 0);

  for (const rect of rectangles) {
    canvas.drawRect(
      {
        x: (RESIZER_HEIGHT - rect.y - rect.height) * scaleToCanvasX,
        y: rect.x * scaleToCanvasY,
        width: rect.height * scaleToCanvasX,
        height: rect.width * scaleToCanvasY,
      },
      paint
    );
  }
});
Objects created during processing are Host objects and their native memory is reclaimed automatically by the garbage collector, so there is no need to release them manually. See Memory Management for details. In a frame processor you can still release the largest objects eagerly if you want to keep peak memory usage low.
Our finished frame handler looks as follows:
onFrame={(frame, render) => {
  'worklet';
  const height = frame.height / 4;
  const width = frame.width / 4;

  const scaleToCanvasX = frame.width / RESIZER_HEIGHT;
  const scaleToCanvasY = frame.height / RESIZER_WIDTH;

  const resized = resizer!.resize(frame) as GPUFrame;
  const pixels = new Uint8Array(resized.getPixelBuffer());
  const src = Mat.createFromBuffer('uint8', height, width, 3, pixels);
  const dst = Mat.create(0, 0, DataTypes.CV_8U);

  const lowerBound = Scalar.create(30, 60, 60);
  const upperBound = Scalar.create(50, 255, 255);
  OpenCV.cvtColor(src, dst, ColorConversionCodes.COLOR_BGR2HSV);
  OpenCV.inRange(dst, lowerBound, upperBound, dst);

  const channels = MatVector.create();
  OpenCV.split(dst, channels);
  const grayChannel = channels.get(0);

  const contours = MatVector.create();
  OpenCV.findContours(
    grayChannel,
    contours,
    RetrievalModes.RETR_TREE,
    ContourApproximationModes.CHAIN_APPROX_SIMPLE
  );

  const contoursCount = contours.length;
  const rectangles: Rect[] = [];

  for (let i = 0; i < contoursCount; i++) {
    const contour = contours.get(i);
    const { value: area } = OpenCV.contourArea(contour, false);

    if (area > 3000) {
      const rect = OpenCV.boundingRect(contour);
      rectangles.push(rect);
    }
  }

  render(({ canvas, frameTexture }) => {
    canvas.drawImage(frameTexture, 0, 0);

    for (const rect of rectangles) {
      canvas.drawRect(
        {
          x: (RESIZER_HEIGHT - rect.y - rect.height) * scaleToCanvasX,
          y: rect.x * scaleToCanvasY,
          width: rect.height * scaleToCanvasX,
          height: rect.width * scaleToCanvasY,
        },
        paint
      );
    }
  });

  resized.dispose();
  frame.dispose();
}}
Result
Cards are detected in real time when they are close enough to the lens.